Configure QuickBooks Billable Expenses for QuickBooks Online
To access and configure your account and settings
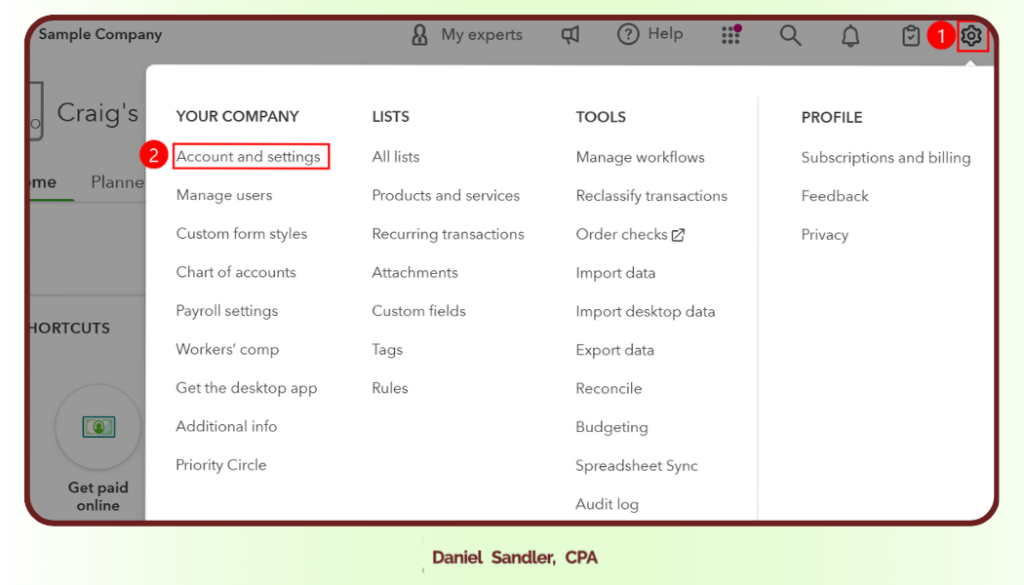
1. Open the Settings Menu:
Navigate to the top right corner of the screen and click on the gear icon to open the settings menu (marked as step 1 in the image).
Access Account and Settings:
Click on “Account and settings” (highlighted as step 2 in the image).
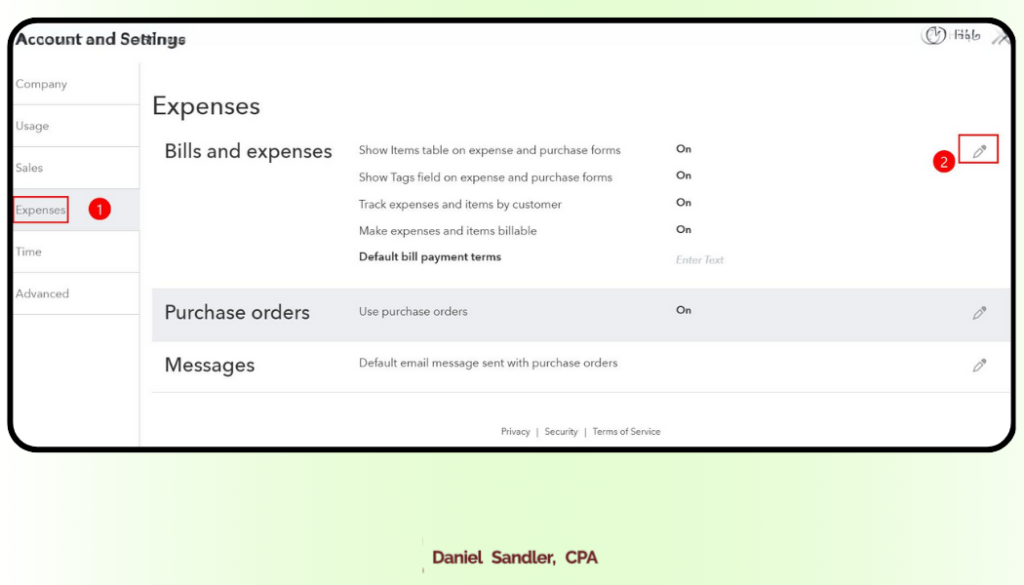
Navigate to the Expenses Section:
In the Account and settings menu, click on the “Expenses” tab on the left-hand side to open the expenses settings (marked as step 1 in the image).
Edit Expense Settings:
To make changes to your expense settings, click on the pencil icon on the right side of the section you want to edit (highlighted as step 2 in the image).
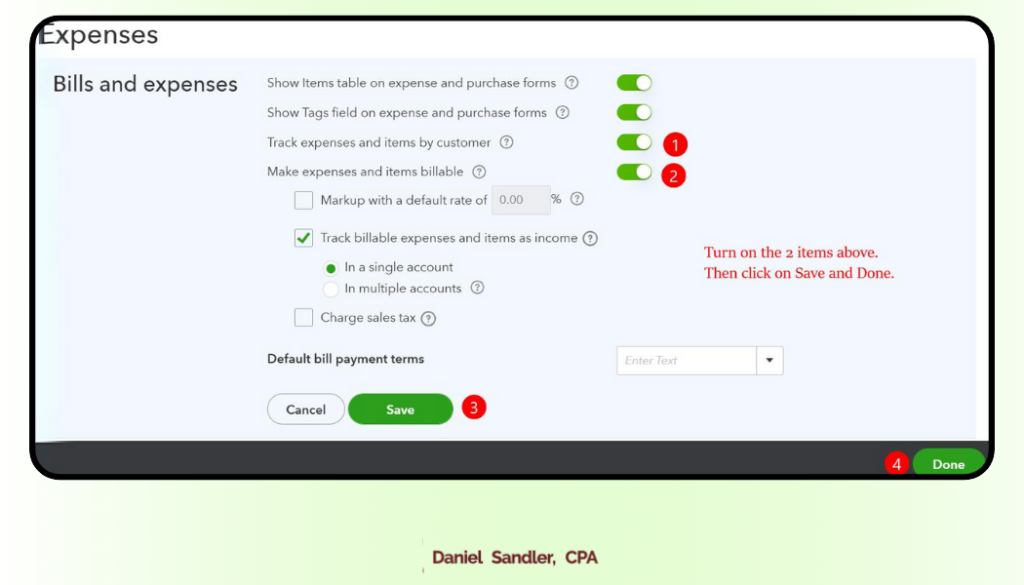
To configure your QuickBooks billable expense settings
Ensure Tracking of Expenses:
Make sure the option “Track expenses and items by customer” is set to On (marked as step 1 in the image).
If you want to apply a markup on your expenses, select the “Markup with a default rate of” box and enter the percentage.
Additional Options:
Decide if you want to count these billable expenses as income by selecting “Track billable expenses and items as income”.
Choose whether to track these expenses in a single account or multiple accounts.
If applicable, check the “Charge sales tax” box to apply sales tax to these expenses.
Save Your Settings:
Once you have configured your settings, click on the “Save” button (marked as step 3 in the image).
Finally, click “Done” to apply and exit (marked as step 4 in the image).
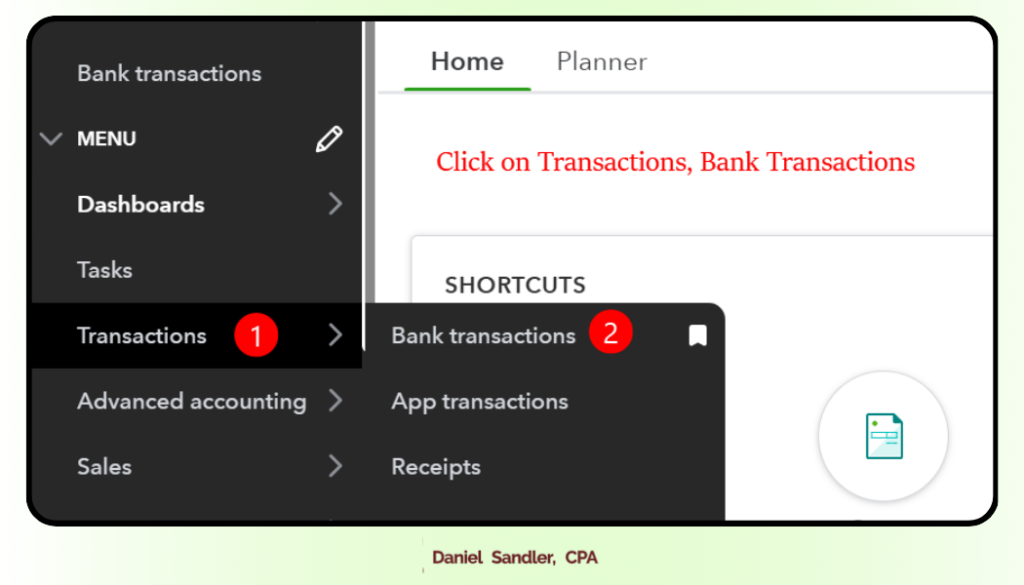
Navigate to the Transactions Menu:
On the left sidebar, click on “Transactions” (marked as step 1 in the image).
Select Bank Transactions:
In the expanded Transactions menu, click on “Bank transactions” (marked as step 2 in the image).
To bill an expense to a customer
Select the Expense:
In the “Bank transactions” tab, find and select the expense you want to bill to a customer (marked as step 1 in the image).
Categorize the Expense:
Click on the “Categorize” radio button (marked as step 2 in the image).
Choose an Account:
Select the appropriate account for the expense from the “Account” dropdown menu (marked as step 3 in the image).
Assign a Customer:
Select the customer you want to bill the expense to from the “Customer” dropdown menu. If the customer is not listed, you can add them here (marked as step 4 in the image).
Make the Expense Billable:
Check the “Billable” box to mark the expense as billable (marked as step 5 in the image).
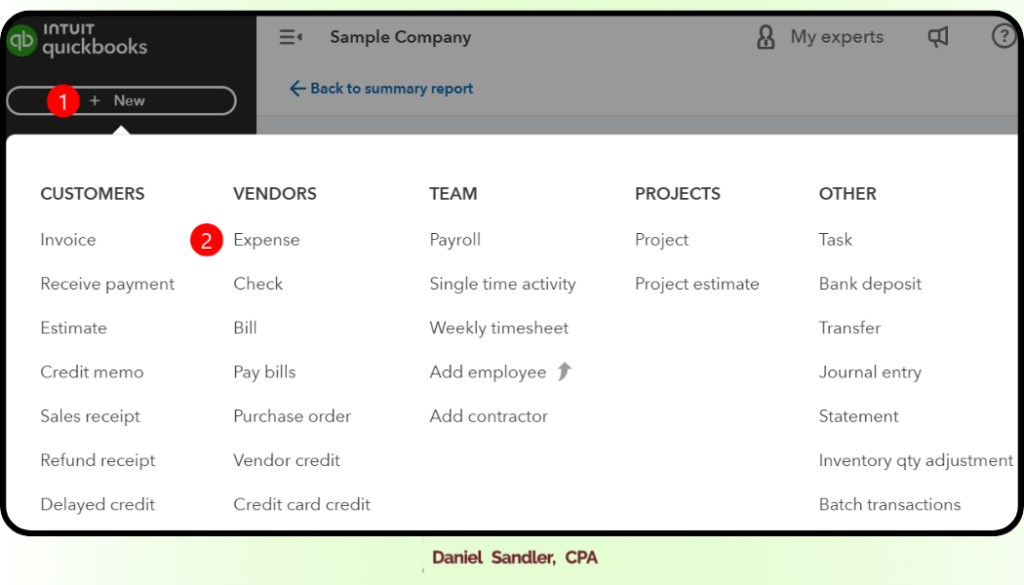
Open the New Transaction Menu:
Click on the “+ New” button at the top left corner of the screen (marked as step 1 in the image).
Select the Type of Transaction:
Under the “VENDORS” section, choose “Expense” to record a new expense (marked as step 2 in the image).
Create a New Expense:
Click on the “+ New” button at the top left corner and select “Expense”.
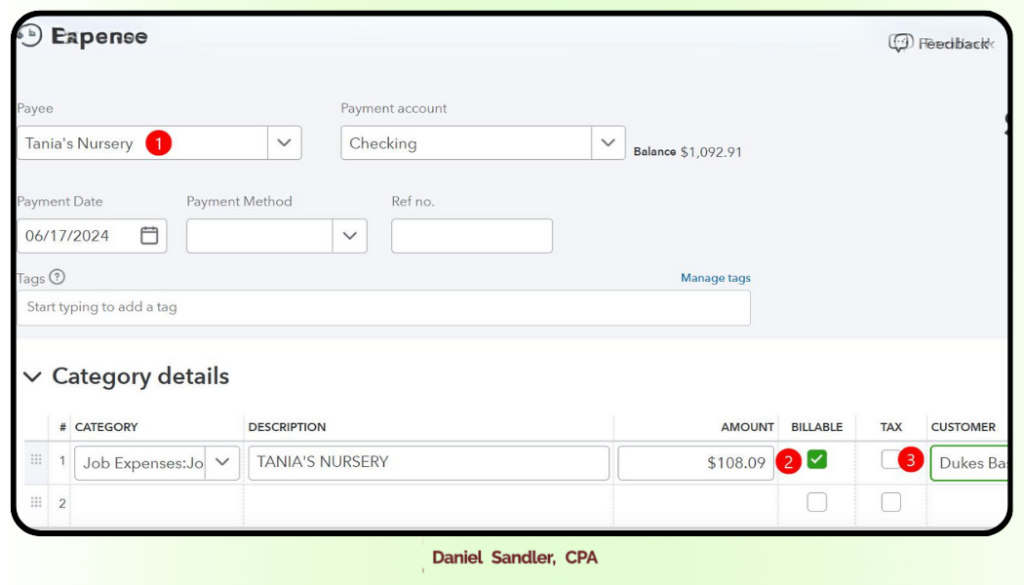
Enter Expense Details:
In the “Payee” field, select the vendor or payee (marked as step 1 in the image).
Fill in the payment account, date, payment method, and any other relevant details.
Make the Expense Billable:
In the “Category details” section, enter the expense details.
Check the “Billable” box to mark the expense as billable (marked as step 2 in the image).
Use the “Customer” dropdown to select the customer you want to bill the expense to (marked as step 3 in the image).
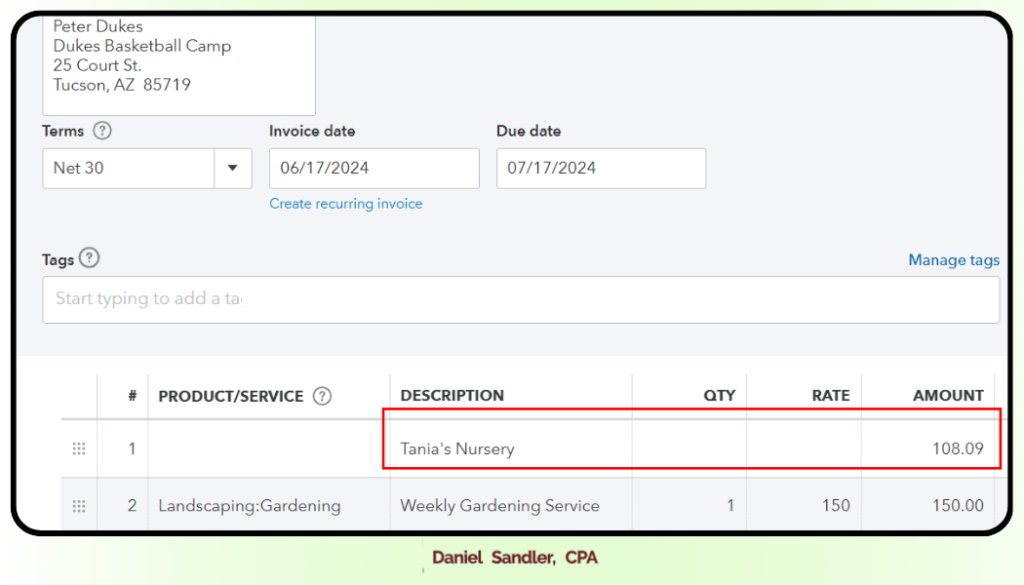
To invoice your customer
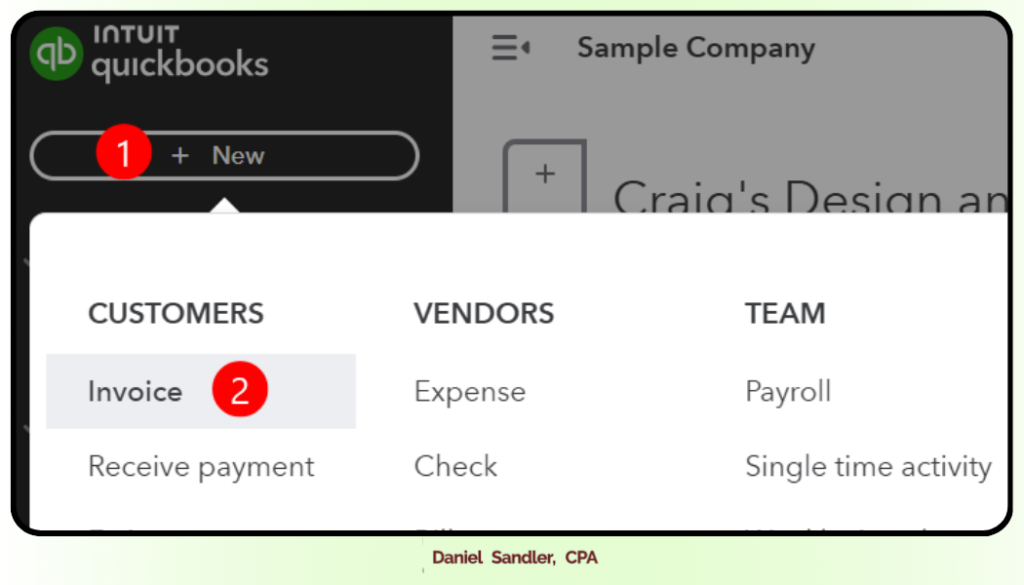
Open the New Transaction Menu:
Click on the “+ New” button at the top left corner of the screen (marked as step 1 in the image).
Select Invoice:
Under the “CUSTOMERS” section, choose “Invoice” to create a new invoice for your customer (marked as step 2 in the image).
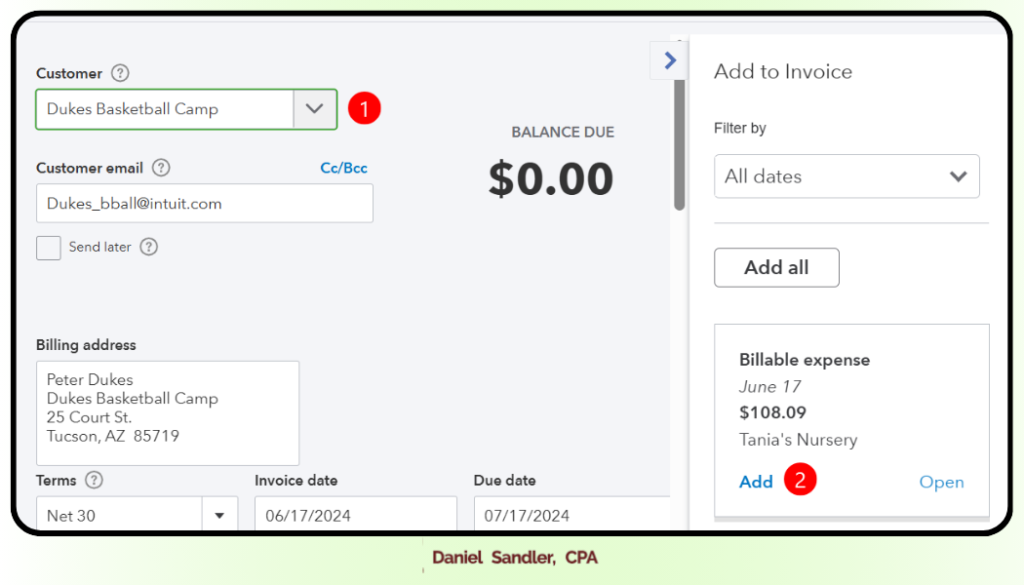
Select Your Customer:
In the “Customer” dropdown menu, choose the customer you want to invoice (marked as step 1 in the image).
Add Billable Expenses:
Under the “Add to Invoice” section on the right, you’ll see all the billable expenses assigned to this customer.
Click “Add” next to the expense you want to include in the invoice (marked as step 2 in the image).
Once you add an expense, it will appear as a line item in your invoice. You can then review and make any necessary changes to the description, quantity, rate, or amount as needed.